家里服务器 CentOS 8.2 安装 Google-Authenticator
1 | https://www.versca.cn/?p=1170 |
1. 时区不对,时间不对 的解决办法
1 | https://www.versca.cn/?p=6159 |
2. 安装过程 ./configure 时会出现个小问题.
1 2 3 4 5 6 | config.status: error: in `/root/google-authenticator-libpam': config.status: error: Something went wrong bootstrapping makefile fragments for automatic dependency tracking. Try re-running configure with the '--disable-dependency-tracking' option to at least be able to build the package (albeit without support for automatic dependency tracking). See `config.log' for more details |
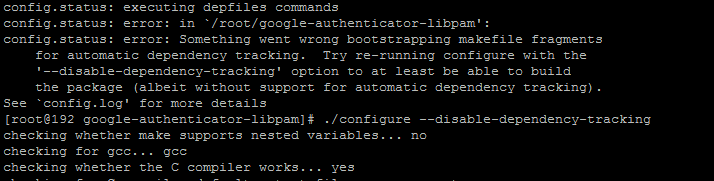
解决办法: 改成如下代码
1 | ./configure --disable-dependency-tracking |
3. 登陆时无法登陆,原因是 google_authenticator 代码错误
3-1. 查看失败的原因:
1 | cat /var/log/secure |
1 2 3 4 5 6 7 8 9 10 11 12 13 14 15 16 | Jul 26 07:55:24 192 sshd(pam_google_auth)[40171]: Invalid verification code for root Jul 26 07:55:24 192 sshd(pam_google_auth)[40171]: Failed to create tempfile "/root/.google_authenticator~gXhiDK": Permission denied Jul 26 07:55:24 192 sshd(pam_google_auth)[40171]: Failed to update secret file "/root/.google_authenticator": Permission denied Jul 26 07:55:28 192 sshd[40169]: Connection closed by authenticating user root 192.168.122.1 port 54228 [preauth] Jul 26 07:55:53 192 sshd(pam_google_auth)[40199]: Accepted google_authenticator for root Jul 26 07:55:53 192 sshd(pam_google_auth)[40199]: Failed to create tempfile "/root/.google_authenticator~DevKgS": Permission denied Jul 26 07:55:53 192 sshd(pam_google_auth)[40199]: Failed to update secret file "/root/.google_authenticator": Permission denied Jul 26 07:56:01 192 sshd[40197]: error: PAM: Authentication failure for root from 192.168.122.1 Jul 26 07:56:10 192 sshd(pam_google_auth)[40216]: Accepted google_authenticator for root Jul 26 07:56:10 192 sshd(pam_google_auth)[40216]: Failed to create tempfile "/root/.google_authenticator~FvTGv7": Permission denied Jul 26 07:56:10 192 sshd(pam_google_auth)[40216]: Failed to update secret file "/root/.google_authenticator": Permission denied Jul 26 07:56:19 192 sshd[40197]: error: PAM: Authentication failure for root from 192.168.122.1 Jul 26 07:56:47 192 gdm-password][40253]: pam_unix(gdm-password:session): session opened for user root by (uid=0) Jul 26 07:56:50 192 polkitd[907]: Registered Authentication Agent for unix-session:4 (system bus name :1.240 [/usr/bin/gnome-shell], object path /org/freedesktop/PolicyKit1/AuthenticationAgent, locale en_US.UTF-8) Jul 26 07:56:58 192 gdm-launch-environment][1308]: pam_unix(gdm-launch-environment:session): session closed for user gdm Jul 26 07:56:58 192 polkitd[907]: Unregistered Authentication Agent for unix-session:c1 (system bus name :1.76, object path /org/freedesktop/PolicyKit1/AuthenticationAgent, locale en_US.UTF-8) (disconnected from bus) |
3-2. 外网找到答案:
1 | SELinux is preventing /usr/sbin/sshd from create access on the file .google_authenticator~gXhiDK |
3-3. 解决办法: 关闭SELinux
1 | vi /etc/selinux/config |
1 | SELINUX=disabled |
1 | reboot //重启电脑 |
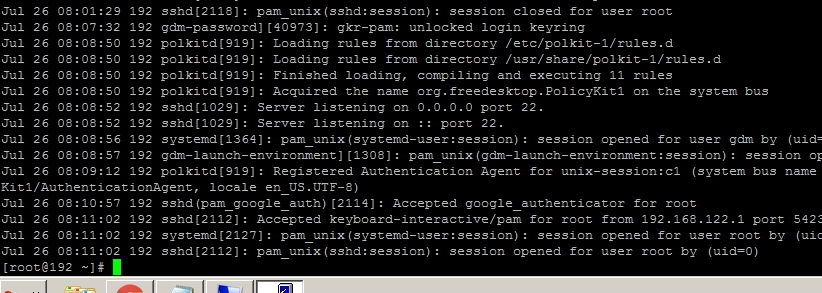
4. 然后再登陆就成功.
5. 把 图形界面换成 代码界面
1 | systemctl set-default multi-user.target |
6. 安装zerotier
1 | https://www.versca.cn/?p=1661 |
===============================================================
===============================================================
解决 “config.status: error: Something went wrong bootstrapping makefile fragment” 问题
1 2 | https://cloud.tencent.com/developer/article/2467977 https://comate.baidu.com/zh/page/2z2a986weoh |
解决方案
原因:这个错误通常是由于 Liunx 系统中没有安装GNU make工具,或者GNU make工具没有被正确配置导致的。
以下是一些可能的解决方案:
检查GNU make工具是否已正确安装:你可以在 Liunx 终端中输入以下命令来检查 Liunx 系统中是否已安装GNU make工具:
(我的虚拟机就说没有安装make ,安装之后即解决)
1 | make --version |
没安装的话,执行以下代码安装即可
1 | yum install make |
如果 Liunx 系统中已安装GNU make工具,它将输出GNU Make的版本信息。如果没有安装GNU make工具,你需要使用包管理器(如apt或yum)来安装GNU make工具。
检查GNU make工具的配置:如果 Liunx 系统中已安装GNU make工具,但仍然出现此错误消息,你可能需要检查GNU make工具的配置。你可以在 Liunx 终端中输入以下命令来检查GNU make工具的配置:
1 | echo $MAKE |
如果MAKE的值不是gmake,可能通过如下命令将 MAKE的值更改为gmake
1 | export MAKE=gmake |
1. 尝试使用–disable-dependency tracking选项:如果你仍然无法解决问题,你可以尝试在运行configure脚本时使用–disable-dependency tracking选项。这将禁用自动依赖跟踪功能,但至少允许你构建包。你可以在 Liunx 终端中输入以下命令来使用–disable-dependency tracking选项:
1 | ./configure --disable-dependency tracking |
请注意,你需要确保在 Liunx 系统中已安装 Liunx 包管理器(如apt或yum),并且可以访问 Liunx 仓库。如果你的 Liunx 系统没有连接到网络,你可以考虑使用其他方法来安装unzip和unrar,例如从 Liunx 安装光盘或其他存储介质中安装。
